Monday, December 17, 2012

Functional Art

The busyness of Christmas has descended upon us and we are feeling more and more like santa’s elves. Between shipping items, filling orders, keeping stores stocked, doing exhibits and baking we are quite ready for Christmas family festivities to begin.

This weeks post is a sweet coat rack that we designed and built, an idea we are excited to expand upon in the future.  We absolutely love using natural materials, finding the beauty in those materials and using them in projects that magnify its beauty.  This coat rack came about when we were on our apple wood binge a few months ago.  The three racks in the middle are apple wood branches and the frame of the coat rack is pine.  I love how the branches have curls and twirls with a rustic feel and the pine frame has nice clean lines, the contrast is really nice.  Once the coat rack was put together and the glue was dried the whole rack received a coat of varnish.  This particular coat rack has three main hooks that can be used for hanging with a couple smaller knotty hooks that can be used as well.

This item is perfect to hang by the front door or even in your bedroom.  It is a flexible piece that looks good pretty much anywhere you want to put it.  The fun thing about the pieces that we make is that they are not only functional but they are pieces of art that add to a house or room or wall.  

Functional Art.


Tuesday, November 27, 2012

Musical Beauty

I absolutely love this idea and how it turned out.  This room was an office in our house but when Jessica and I found out we were pregnant it quickly became the nursery.  I wish I could take credit for this cool idea but it was all my wife's idea.  She thought of it well before we were pregnant while the room was still an office.  

This room is not a huge room by any step but has big beautiful french doors and another window facing west so there is always loads of natural light.  Since we did not know if the baby would be a boy or girl we painted it a neutral color on the 3 walls and left the 4th wall for the hymn sheets.  The hymn sheets used for this wall are from antique hymn books that we salvaged from an old local church.  Each sheet was cut out and trimmed to size.  We used a wall paper adhesive, that you can get from home depot, and started from the top left hand corner.  We worked our way from up to down and left to right.    In total we used almost 2 whole hymn books.  We took the more popular hymns and ones that were special to us and placed them at eye level, the rest we spread throughout the wall.  The adhesive dries fairly quick so we applied it individually to each sheet using a paint brush.  My wife was the one laying the sheets on the wall.  She kept such a straight line, all by eye, amazing. 

Every person that comes to our house can't help but stare at this wall, as it is the perfect compliment to the rest of the room.  Not only does it look beautiful but it is also meaningful.

Musical Beauty! 


Monday, November 19, 2012

Show Success


Our first show is under our belt!  

All 3 of the Falling Opposite team members have done various shows and exhibits over the years individually but this is our first show as a team.......and it was awesome!  We had such a fun show and did better then expected.   

All proceeds generated from the admission for this show went to the Newmarket Doane House, who also put this show on.  We had a blast all day meeting people, making connections and selling lots of our wonderful creations. 

This week we are busy replenishing our supply of products and creating new products for 2 more shows this weekend.  If you were not able to come out to the last show then you must come to this one.  It is a great way to support great causes and local artist all while getting Christmassy.....

See you there.......


Friday, November 16, 2012

CHRISTMAS SHOW'S

Christmas, Christmas, Christmas!  

This Sunday November 18th is our first show and we have been spending this week getting ready to show and sell.  We have been having such a blast together creating new Christmas products and working on our booth design.  Later next week we will also be in 2 more shows that are sure to be just as fun.  Today we were doing a trial run on our booth design and set up and thought we would let you all in on a few photo’s just to whet your appetite.  

Be sure to come on out and support not just us but all of the hand made / unique craft artisans.  Also 2 of our upcoming shows are in support of the Newmarket Doane House and The United Way, both great causes.

This Sunday we will be at the Newmarket Community Centre at 10:00am-4:00pm.  
On Friday November 23 we are at Newmarket’s York Regional Building at 9:30am-3:30pm.  
And
On Saturday November 24 we are at the Newmarket Christmas Farmers Market!  


P.S........To add to the Christmas festivities we will also be raffling off an amazing hand made piece of art ginger bread house.  Each show will have its own raffle!


Monday, November 12, 2012

Furniture With A Cherry On Top

Lately we have been doing a lot of posts about our new Christmas creations so, I thought we should do a little switcheroo and put this beauty side table up.  

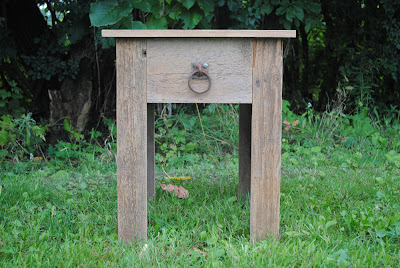
The body of this table is made from rustic re-claimed barn wood.  The boards that I used were actually for another job but the customer changed their mind on the type of wood they wanted and voila, this table was born.  The table top is made from 3 pieces of solid oak that has these beautiful worm holes throughout it and some sweet knots.  The drawer handle I am super excited about.  I rescued them from an old barn and have been holding onto them until I found just the right piece for them.  

Like many of our projects we like to leave things in the most original state that we can.  This side table received a nice sand but was left with out any product applied.

I love how this table has a rustic feel and at the same time strong clean lines but the cherry on top for me are the drawer pulls.  The pulls bring the whole design together and add a unique touch.  We were so pleased with how this table turned out we made it into a set.


Furniture With A Cherry On Top.


Friday, November 9, 2012

Hang up the Stockings!!!!!!!!!!!!!!

That’s right, we are busy decking the halls and this week it’s all about Christmas stockings!  Many people have been asking us if we would be making stockings this year, so who are we to disappoint?
But of course, being the crazy creative people we are, we went a little wild! 

The base of all of the stockings is fabric, anything from cotton to grey suiting.  It’s the cuffs that give each it’s own distinct style and personality.  Take, for example, the blue ‘royal’ stocking.  A basic but beautiful deep blue corduroy is complimented with a satin pleated cuff and a gold, understated, crown has been applied for that extra touch.  Other stockings feature a cotton base and a knitted cuff.  On top of some of these cuffs I embroidered designs which, though varied, can appeal to a variety of people.  
Not the usual, rather rotund ( and oversized) stockings we are used to seeing, 
these have a more tapered and sleek look.
 (lets say I stole the stocking of a skinny leg rather than using Santa’s winter socks) 

They are all ready to be stuffed for Christmas and will be on the Etsy page throughout the week!


Wednesday, October 31, 2012

A Picture Frame Say's A Thousand Words

If a picture say's a thousand words then the frame that it sits in should too.  To us a picture frame is not just a frame, it is a piece of art.  
This 3 frame set is made from an old salvaged piece of wood that was left in almost original condition.  Once the frame was assembled it was given a light sand.  The fun thing about these frames is the more you sand them, the more layers of character are exposed.  On the outside it was white, before that it was a dark redish color, before that it was a greeny color and before that it was the wonderful wood grain.  Each one of these frames have a rustic artsy feel to them that is the perfect compliment to any picture.   

This set consists of a 4 x 6, a 5 x 7 and an 8 x 10.  

I have made a lot of frames and each is so different.  My favorite ones are usually the ones that have original character with layers of color.  I love the layers of color because its like it is telling a story of its own history.  I guess a frame really can say a thousand words.

Original beauty.


Monday, October 29, 2012

Joah Asaph Rybka Weaver

This is the newest creation from Falling Opposite.  This is and forever will be my absolute favorite.  Joah Asaph Rybka Weaver was born on October 24, 2012 at 6:01pm.  

Throughout time the creation of man and woman have been the crowning achievement of a God who's creative ability's know no bounds.  Joah, like every other human being, was made in the image of this God and yet is like no other human being.  Talk about creativity.  
He was made with 10 fingers and 10 toes.  He has 2 eyes and 2 ears.  He has 1 nose and 1 mouth.  His hair is dark and rich.  His skin is soft and smooth.  Every part of him was knit together before he was even in his mothers womb.  This amazing God of Love was moved with inspiration which led to the creativity that birthed the creation.  Joah is a constant reminder that everything we make as the Falling Opposite team points to the greatest inspiration that we will ever have......A loving Father in heaven who created each and every one of us unique and beautiful.  

We welcome you baby Joah!

****

In celebration of Joah's arrival we are having a 10% off sale on our Etsy store from Oct 29 - Nov 5, 2012.  Just enter joah24 when you check out.

****

Keep checking our Etsy store for fun unique baby items as we are inspired by our new team member.


Monday, October 22, 2012

Wreaths, Wreaths Everywhere!

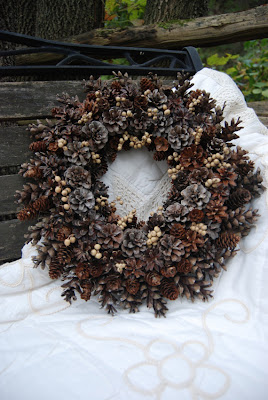
Well, we are getting more and more excited about the upcoming season and have been coming up with a crazy amount of ideas. In thinking about what would be the perfect accessory for Christmas one thing always comes to mind, wreaths! This week I made so many I was literally seeing circles!  The ideas for them always come from the craziest places and one idea always leads to another, and then another, and then another. 

While walking the aisles of one of my favorite stores I spotted a wooden puzzle. After purchasing it I put it together, soaked it in water to remove the paper image and then stamped it with my favorite designs. It was then taken apart and individually glued onto a hand cut wooden circle, all 1000 pieces. Another wreath was made by folding the pages from antique hymn books (saved from a church demolition) into circle fans and then glueing them onto a wreath form. 

 Many wreaths are in keeping with our natural feel and were made using all kinds of dried materials (I love the international aisle of my grocery store, so much inspiration!)  Searching for pinecones has also become a new hobby and you never know what you are going to find out in the woods. 


 In any case, enjoy looking at these one of a kind pieces and they will all be available for purchase on our etsy shop soon!


Tuesday, October 16, 2012

Apple Wood Ipod Dock


Ok, so...I'm super stoked about this Ipod Dock.  It took me a few different tries to get it right but finally I got it to meet our standards :)  When I am in the shop I usually create things based on inspiration that I get from materials.  I'll see a certain piece of wood and will see a product / creation.  This piece is an example of just that.  I have been working with apple wood for the better part of this month and have been enjoying it a lot.  When I got my hands on this nice big chunk and saw the richness in the wood I kept thinking how it would make a sick Ipod dock.  And now, voila.  

The first couple that I made I free handed with the router just to get an idea of what I wanted it to look like.  When I figured out the design I made 3 separate router jigs out of compressed masonite board.  I rigged up a clamping system and then went at it starting from the biggest opening down to the smallest. For this particular Ipod dock I used 3 separate router bits for the various holes.  On the underside I used the router to make an 'S' slot for the wire.  I made it nice and snug so the the wire and plug will stay secure.  Once all the holes were cut the whole piece got a nice sand with medium grit sand paper and then a light finishing sand paper to polish it up.  When this apple wood gets a good sand and polish it has an unreal feel to it that keeps you coming back to it and rubbing your hands on it.  

Rustic Ipod dock = :)

This is the first of many Mac accessories that just came out of our shop and can be purchased on our Etsy store.  

Cheers!


Saturday, October 13, 2012

Butterscotch Bakes Recipe Box

This recipe box is such a treat. It was a gift for a family member who had recently started a baking blog, (butterscotchbakes.wordpress.com). The box itself was made with barn board we had in the shop. Once the box was complete the white, lace inspired background was hand painted and the lettering hand inked. The box was then given a few coats of varnish and some hinges added to attach the lid.
Once the box was together we created some custom recipe cards that echo the Butterscotch Bakes theme and fit perfectly inside, waiting to be filled with all sorts of delicious creations.

Take a glance at the photos below,  the end result is simple and sweet.